Object detection with darknet (YOLOv3)
Learn how to use darknet to detect objects in images with YOLOv3

Introduction
Object detection and identification is a major application of machine learning. Today, we're going to install darknet , which makes these tasks very easy.
I will describe what I had to do on my Ubuntu 16.04 PC, but this tutorial will certainly work with more recent versions of Ubuntu as well.
Please make sure that your PC features an NVidia graphics card compatible with CUDA .
You will learn how to:
- install CUDA and OpenCV easily on your machine
- compile darknet with CUDA and OpenCV, for boosted performance and an improved user interface
- perform object detection on your images.
We will not address real-time object detection in video streams, this will be the subject of the next post.
Install CUDA
CUDA is a parallel processing architecture developped by NVidia to make use of GPU resources. It is used in a wide variety of applications : machine learning, parallel computing, gaming, etc.
It is necessary if you want to use darknet with a GPU. That's indeed what we want to do, so let's get started.
Again, these are the instructions for Ubuntu 16.04, but please feel free to try them with more recent versions of Ubuntu.
Download CUDA . Select your operating system, your architecture, your distribution, the version of the distribution, and the installer type. Here is what I picked.

Download the base installer. For that, either click on the Download link, or copy this link to use it with wget:
wget https://developer.download.nvidia.com/compute/cuda/repos/ubuntu1604/x86_64/cuda-repo-ubuntu1604_10.1.105-1_amd64.deb
Then, execute the provided commands:
sudo dpkg -i cuda-repo-ubuntu1604_10.1.105-1_amd64.deb
sudo apt-key adv --fetch-keys http://developer.download.nvidia.com/compute/cuda/repos/ubuntu1604/x86_64/7fa2af80.pub
sudo apt-get update
sudo apt-get install cuda
This is going to take quite a bit of time. At some point, this will install the nvidia drivers for your graphics card. The installer might tell you that UEFI secure boot is enabled, and have you set a password. In my experience, this password will not be strictly required at boot, and everything will work. So set the password, and don't worry about what happens next.
When you're done, reboot your machine.
Now, check the list of installed packages:
sudo apt list --installed cuda*
And list the files installed for one of the packages, for example:
dpkg-query -L cuda-samples-10-1
In my case, CUDA is installed in /usr/local/cuda-10.1, and a symbolic link is added as /usr/local/cuda to this directory. From now on, we will use this link.
Testing CUDA
To test that CUDA works, go to the CUDA demo suite directory:
cd /usr/local/cuda/extras/demo_suite/
Check that CUDA can find your GPU (or your GPUs if you have more than one):
./deviceQuery

./deviceQuery Starting...

 CUDA Device Query (Runtime API) version (CUDART static linking)

Detected 2 CUDA Capable device(s)

Device 0: "GeForce GTX 1080 Ti"
  CUDA Driver Version / Runtime Version          10.1 / 10.1
  CUDA Capability Major/Minor version number:    6.1
  Total amount of global memory:                 11178 MBytes (11721506816 bytes)
  (28) Multiprocessors, (128) CUDA Cores/MP:     3584 CUDA Cores
  GPU Max Clock rate:                            1582 MHz (1.58 GHz)
  Memory Clock rate:                             5505 Mhz
  Memory Bus Width:                              352-bit
  L2 Cache Size:                                 2883584 bytes
...
Then let's simulate a number of particles:
 ./nbody -benchmark

...
> Windowed mode
> Simulation data stored in video memory
> Single precision floating point simulation
> 1 Devices used for simulation
GPU Device 0: "GeForce GTX 1080 Ti" with compute capability 6.1

> Compute 6.1 CUDA device: [GeForce GTX 1080 Ti]
28672 bodies, total time for 10 iterations: 27.356 ms
= 300.511 billion interactions per second
= 6010.227 single-precision GFLOP/s at 20 flops per interaction
If you see similar messages, you're done with the installation of CUDA!
However, CUDA comes with some commands that we will need to use later on. These commands are in /usr/local/cuda/bin. So you need to add this directory to your PATH so that the system finds them when you type them on the command line or in scripts.
Just do the following (I guess you're using bash and if not, you know what to do :-) ):
export CUDA=/usr/local/cuda
export PATH=$CUDA/bin:$PATH
💡 You may add these lines to your .bashrc
Install OpenCV
OpenCV is the open source computer vision library, and it's super powerful. Here, we're only going to use it through darknet to display images. But it's really worth learning. Here are a few random things that you can do with it:
- video input and output
- 3D reconstruction
- video analysis
- object detection
- image stitching to make panoramas
- ...
You could start with the OpenCV tutorial , and also have a look at the very nice blog from Adrian Rosebrock. That's actually where I first got in touch with OpenCV!
So let's install the tool. That's really easy:
sudo apt-get install libopencv-dev
Make sure than it is correctly installed by doing:
 pkg-config --libs opencv

/usr/lib/x86_64-linux-gnu/libopencv_calib3d.so -lopencv_calib3d /usr/lib/x86_64-linux-gnu/libopencv_contrib.so -lopencv_contrib /usr/lib/x86_64-linux-gnu/libopencv_core.so -lopencv_core /usr/lib/x86_64-linux-gnu/libopencv_features2d.so -lopencv_features2d /usr/lib/x86_64-linux-gnu/libopencv_flann.so -lopencv_flann /usr/lib/x86_64-linux-gnu/libopencv_gpu.so -lopencv_gpu /usr/lib/x86_64-linux-gnu/libopencv_highgui.so -lopencv_highgui /usr/lib/x86_64-linux-gnu/libopencv_imgproc.so -lopencv_imgproc /usr/lib/x86_64-linux-gnu/libopencv_legacy.so -lopencv_legacy /usr/lib/x86_64-linux-gnu/libopencv_ml.so -lopencv_ml /usr/lib/x86_64-linux-gnu/libopencv_objdetect.so -lopencv_objdetect /usr/lib/x86_64-linux-gnu/libopencv_ocl.so -lopencv_ocl /usr/lib/x86_64-linux-gnu/libopencv_photo.so -lopencv_photo /usr/lib/x86_64-linux-gnu/libopencv_stitching.so -lopencv_stitching /usr/lib/x86_64-linux-gnu/libopencv_superres.so -lopencv_superres /usr/lib/x86_64-linux-gnu/libopencv_ts.so -lopencv_ts /usr/lib/x86_64-linux-gnu/libopencv_video.so -lopencv_video /usr/lib/x86_64-linux-gnu/libopencv_videostab.so -lopencv_videostab
This gives you the list of OpenCV libraries needed to compile code with OpenCV, e.g. darknet as we will see in the next section.
Install darknet
The installation instructions of darknet are very well written.
Follow the first section, which is going to show you how to:
- download darknet
- compile it without support for CUDA and OpenCV
- test that the darknet executable runs
If everything is ok, we can enable CUDA and OpenCV support.
First, clean up everything:
make clean
Then, open the Makefile in your favourite editor. At the beginning of the file, set the GPU and OPENCV flags to 1 like this:
GPU=1
CUDNN=0
OPENCV=1
OPENMP=0
DEBUG=0
Later in the Makefile, you will see that CUDA is expected to be installed in /usr/local/cuda. That's precisely where we installed it, so we should be all set.
OpenCV is expected to be installed as a package as we did. The list of OpenCV compilation and linking flags are generated with pkg-config here:
ifeq ($(OPENCV), 1)
COMMON+= -DOPENCV
CFLAGS+= -DOPENCV
LDFLAGS+= `pkg-config --libs opencv` -lstdc++
COMMON+= `pkg-config --cflags opencv`
endif
We tried pkg-config already, so again we should be ok.
Now compile darknet (here I use 4 CPU cores in parallel to compile):
make -j 4
Please have a look at the log of the compilation. There should be no error. I have one deprecation warning but it's ok:
In file included from /usr/local/cuda/include/cuda_runtime.h:96:0,
                 from include/darknet.h:11,
                 from ./src/utils.h:5,
                 from ./src/gemm.c:2:
/usr/local/cuda/include/cuda_runtime_api.h:955:57: note: declared here
 extern __CUDA_DEPRECATED __host__ cudaError_t CUDARTAPI cudaThreadSynchronize(void);
Trying darknet
You can now try to detect objects in an image with darknet. Again, the instructions are really clear .
We are going to use a pre-trained YOLOv3 model. First (and only once), download the trained weights for this model:
wget https://pjreddie.com/media/files/yolov3.weights
Then, you can run the detection on one image:
./darknet detect cfg/yolov3.cfg yolov3.weights data/dog.jpg
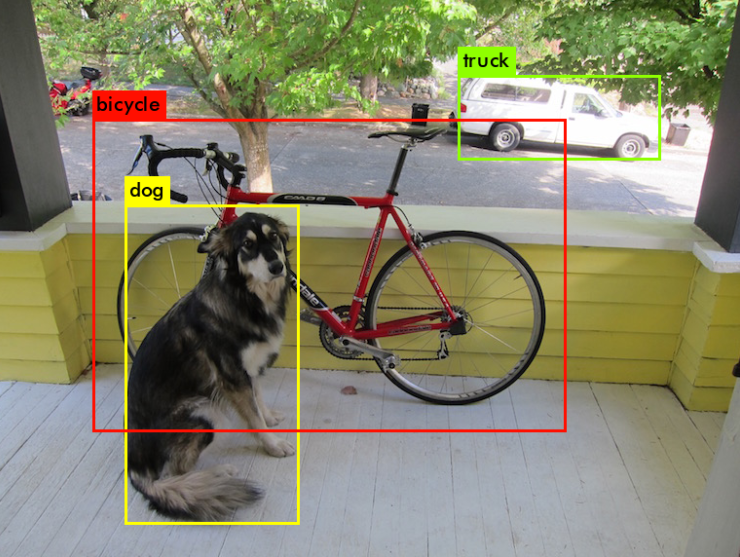
Most of the time is spent loading the weights for the model. The actual detection took 200 ms.
But that still seems too long! If we are to do real time detection at 24 images / s, we should do much better than this. I'm trying to find out if that's normal, and will update the post when done. Maybe my two GeForceGTX 1080 Ti are not enough, or maybe only one of them is used...
I have tried the same exercise on the CPU, and it takes 37 s, so for sure, at least a GPU is used.
There are other images that have been provided by the author in the data/ directory. Just try them.
And of course, you can try with your own pictures as well!

What now?
In this post, you have learnt how to:
- install CUDA and OpenCV. CUDA is necessary to boost the speed of darknet by making use the GPU, and OpenCV makes it more convenient to use.
- compile darknet
- do basic object detection in pictures
Very soon, we will see how to detect objects in a video!
Also, I'm planning a small series of tutorials on OpenCV. It's a more basic tool but it has the advantage of being usable on a raspberry pi.
More about image recognition
- Handwritten Digit Recognition with scikit-learn : simple introduction to dense neural networks and machine learning, and to the scikit-learn library.
- First Neural Network with Keras : same exercise, this time with keras.
- Tuning a Deep Convolutional Network for Image Recognition with Keras and TensorFlow (Handwritten Digits) : learn how to adapt the parameters of a convolutional network for best performance
- Image Recognition: Dogs vs Cats (92%) : discriminate pictures of dogs and cats, with special emphasis on data augmentation and the choice of the optimizer.
- Image Recognition with Transfer Learning (98.5%) : use state-of the art pre-trained models for easy and powerful image classification. Introduction to the VGG and ResNet neural networks.
- Real-time human detection with OpenCV : detect humans in a video with the HOG algorithm.
Please let me know what you think in the comments! I’ll try and answer all questions.
And if you liked this article, you can subscribe to my mailing list to be notified of new posts (no more than one mail per week I promise.)
Learn about Data Science and Machine Learning!
You can join my mailing list for new posts and exclusive content: