Remote jupyter notebooks with ssh port forwarding
Access your jupyter notebook server remotely

About this post
I've got a linux machine dedicated to deep learning development in my lab. It's quite nice, with 20 cores, 64 GB RAM, a large amount of SSD disk space for my data, and most importantly two GeForce GTX 1080 Ti.
Unfortunately, it's behind a firewall and is not directly accessible from outside. Still, quite often, I either don't have time to commute to the lab and just work from home, or I'm at CERN, 200 kms away.
In this post, I'd like to show how I proceed to create and use jupyter notebooks on a remote machine.
You will learn how to:
- create an ssh tunnel to a remote machine behind a firewall
- start a jupyter notebook server on this machine
- connect to this server from a browser running on your local machine to create and use jupyter notebooks
It might take you 10 minutes to set everything up the first time, but it's worth it. Afterwards, you'll need only a couple seconds to set up the connection with your remote jupyter notebooks.
Before we get started, please keep in mind that I'm just a physicist with limited knowledge of networking. Therefore, the terminology I'm using may be incorrect. I only try to find ways to do data science efficiently, and I hope I can help you with that as well.
Network configuration
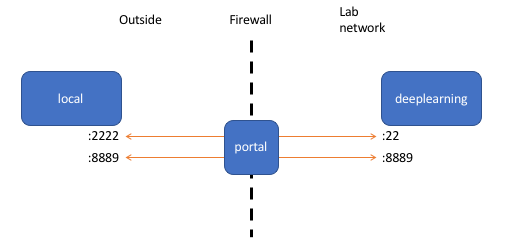
The computers involved are the following:
- deeplearning is the deep learning station. This machine is inside the lab network and is not accessible from outside, but I have ssh access to it from inside.
- portal is on the lab network, and is also visible from outside. I can ssh to it from anywhere.
- local is outside the lab network.
That's a fairly typical configuration in research labs and companies.
In this situation, what most physicists would do is the following:
- connect from the local to portal with ssh -X
- connect from the portal to deeplearning with ssh -X
- start jupyter notebook on deeplearning. This opens a browser on deeplearning, and displays the browser window on local.
This does work because we used ssh with the -X option, which enables X11 forwarding, and thus makes it possible to open graphics application remotely. But there are several issues:
- If local runs macOS, there are incompatibilities between the X11 on deeplearning and the one on the mac, when nvidia drivers are used on deeplearning. And that's clearly the case here since we want to make use of nvidia GeForce GPUs for deep learning. These incompatibilities make the remote graphics applications sluggish even on very fast networks.
- If your local network connection is slow, the browser will feel slow and unresponsive.
The solution is to open the browser locally, and to route the traffic between the browser and the jupyter notebook server running on deeplearning, through portal.
Set up port forwarding
macOS or Linux
If your local machine runs macOS or Linux, do the following:
ssh -L 2222:deeplearning:22 -L 8889:deeplearning:8889 portal
Obviously, you need to replace deeplearning and portal by the addresses of these machines in your case.
What this command is doing is to establish an encrypted ssh connection to portal. Each -L option instructs ssh to forward a port on your local machine to a port on deeplearning:
-L 2222:deeplearning:22 forwards port 2222 on the local machine to port 22 on deeplearning. After this is done, connecting to port 2222 on the local machine will be the same as connecting to port 22 on deeplearning. Port 22 is the one on which ssh servers listen so now, you can do:
ssh -p 2222 localhost
This establishes a connection to the local machine on port 2222 and voilà! with port forwarding, you are directly logged on deeplearning.
The other port, 8889, will be used later for the jupyter notebook.
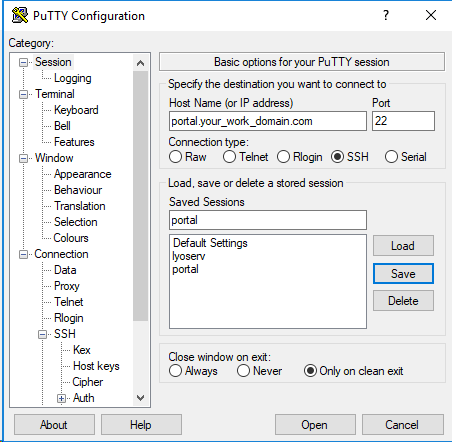
Windows
First install PuTTY , which contains an ssh client, and start this application.
In the main Session window, enter the hostname or IP address of the portal machine. Keep everything as default, and save this session for later.
Then, in Connection-SSH-Tunnels, forward local port 2222 to port 22 on the deeplearning machine, and local port 8889 to port 8889 on the deeplearning machine:
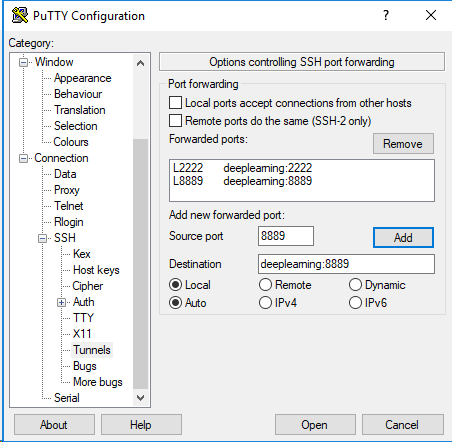
Then go back to session, click Save again to save your changes on the port forwarding, and click Open to open the ssh session to portal. A terminal window will appear where you can enter your username and password.
Once logged in portal, just ssh to deeplearning as usual to start the jupyter notebook as explained in the next section.
Start the jupyter notebook
After logging to deeplearning as instructed above, you can start your jupyter notebook server. Don't forget to initialize the conda environment you need before doing that:
jupyter notebook --no-browser --port=8889 --ip=0.0.0.0
Here is what these options are doing:
- do not open a browser on deeplearning, which is the default when a jupyter notebook server is started.
- listen to port 8889. That's the port we will connect to. Remember that we forwarded this port through portal.
- allow any ip address to connect to this port. By default, the jupyter notebook server would only allow the localhost (deeplearning) to connect to this port.
Connect to the jupyter notebook server
Now, on your local machine, open a web browser and type this url:
http://localhost:8889
This connects to port 8889 on your local machine, which is forwarded to port 8889 on deeplearning, which is the one the jupyter notebook server listens to.
At your first connection, you will need to set up a password for your jupyter notebook server. Simply follow the instructions.
That's it! you now have access to the remote jupyter notebook server from your local browser!
A more permanent solution
Now you probably don't want to have to start the jupyter notebook server everytime you want to work remotely.
So what you can do is to start the server with nohup:
nohup jupyter notebook --no-browser --port=8889 --ip=0.0.0.0 &
After that, you can log out of deeplearning, and the server will keep running until the machine is rebooted, or you stop the server.
Next time, the only thing you need to do to connect to the server is:
- establish the forwarding of port 8889 with ssh or PuTTY.
- go to http://localhost:8889
Summary
In this post, you have learnt how to:
- create an ssh tunnel to a remote machine behind a firewall;
- start a jupyter notebook server on this machine;
- connect to this server from a browser running on your local machine to create and use jupyter notebooks.
I hope it will make your life easier.
The port forwarding technique can of course be used to access other kinds of servers behind a firewall.
Until next time!
Read more about jupyter notebooks
- Interactive Visualization with Bokeh in a Jupyter Notebook : Matplotlib is not for interactive display. Try bokeh!
- rJupyter Notebooks in Web Pages : Finally manage a perfect integration of jupyter notebooks on your website. : Finally manage a perfect integration of jupyter notebooks on your website.r
Please let me know what you think in the comments! I’ll try and answer all questions.
And if you liked this article, you can subscribe to my mailing list to be notified of new posts (no more than one mail per week I promise.)
Learn about Data Science and Machine Learning!
You can join my mailing list for new posts and exclusive content: