Open source smart home with home assistant and docker
Deploy home assistant with docker on a raspberry pi: step-by-step tutorial
In this post, you will learn how to build an open-source smart home, with a raspberry pi, home assistant, and docker, to stay in control of your data and avoid vendor lock-in.
Real estate experts predict that within the next couple years, all new properties will be smart homes.
At the moment, in the US, 27% of households own at least one connected device. This proportion is also relatively high in Europe, with 16% in Germany, 12% in France, and 8% in Italy.
The market has been expanding for a few years, and the big actors take position with their proprietary solutions. Of course, the GA(F)A are already here : Google Home / Nest, Amazon Alexa, Apple HomeKit. And they are not alone : large companies like Philips (Hue) or Legrand (Netatmo) also want their share of the cake.
This game involves a growing number of big chinese players. The most notable one is probably Xiaomi, which builds the best home electronics devices I’ve seen so far (Aqara, Mi).
A smart home comprises:
- Connected devices, such as temperature or motion sensors, smart bulbs, swithes, or security cameras.
- A hub that makes it possible for the devices to communicate, and for you to interact with your smart home, even when you’re away.
Connected devices may communicate in different ways :
- proprietary protocols on the 433 MHz radio frequency band. This is the case of many older Somfy devices, for example. Some companies also use the 868 MHz frequency band, but it’s much less common.
- Zigbee or Z-Wave, which are standardized protocols that allow to establish a mesh network from all devices, in such a way as to cover the whole house easily. Both protocols require very little power and work very well. I use Zigbee because Z-Wave devices are way too expensive for me.
- Wifi. Very common, but requires a lot of power : wifi connected devices need to be powered by USB and cannot operate for a long time on battery. This is perfectly fine for media players, printers, and cameras, but is a major drawback for all the little sensors and switches : just imagine an open-close sensor on a door connected to a USB charger at all times...
The hub is a concern for two reasons.
First, the hub will only handle devices from the same brand. So you’re locked in : you’ll have to keep buying more and more devices from the same brand. Often overpriced because your’re locked in. And if this line of products is discontinued, you’ll have to start all over again from scratch with something else.
Second, the hub is connected to internet and knows about your network and your devices. If the Hub software is closed source, who knows what the hub is doing with your data ? Is it even properly secured ?
There are several open source solutions for home automation, e.g. openHAB, Domoticz, Jeedom. I’ve tried a few, and I think that home assistant is the best.
And it’s written in python ! So if need be, I can even code what I need by myself. Or at least can I understand the code.
Home assistant runs very well on a raspberry pi (I use a 3B+). It’s a perfect, low-power home automation station. And you can also run it on your NAS if you have one.
In this article you will learn how to :
- install docker on your raspberry pi
- install home assistant with docker
- set up your first home dashboard
Raspberry pi installation
Get a raspberry pi. A raspberry pi 3B+ is perfectly fine, and you can also go for the fancier raspberry pi 4 if you so wish. But clearly, you won't need that much horsepower.
To install, you can follow my tutorial for a headless install: Raspberry pi Zero W : Headless Install. It has been written for a raspberry py Zero W, but it will work just fine with any kind of raspberry pi. Just note that :
- Rasbian is now called Raspberry Pi OS,
- you can now use the raspberry pi OS imager to easily download and burn the OS image to your SD card.
When done, make sure to upgrade your system:
sudo apt update
sudo apt upgrade
And install docker as explained in the next section.
Install docker
To install docker on a raspberry pi, follow the official instructions, that I recall here:
curl -fsSL https://get.docker.com -o get-docker.sh
sudo sh get-docker.sh
Add the pi user to the docker group to allow this user to use docker without sudo:
sudo usermod -aG docker pi
Log out and log back in to refresh the group definitions, and then test:
docker run hello-world
In addition, we will need docker-compose, which makes it easy to define and run docker services. The easiest way to install docker-compose is to do it with pip.
So install pip for python 3:
sudo apt install python3-pip
pip3 install docker-compose
Log out and log back in, and docker-compose will be in your PATH, which means that the system will find the executable when you type the command. Test it:
docker-compose
Install home assistant
If you want an introduction to docker and docker-compose, you could have a look at my article Data pipeline with Docker, InfluxDB, and Grafana.
Create a working directory for your home assistant configuration :
mkdir home
cd home
Inside, create a docker-compose.yml file :
version: '3'
services:
  homeassistant:
    container_name: home-assistant
    image: homeassistant/home-assistant:stable
    volumes:
      - ./config:/config
    environment:
      - TZ=France/Paris
    restart: always
    network_mode: host
This compose file declares how you want to run your home-assistant container:
- the container is created from the official image from the home assistant team, built from the stable version of the code.
- the directory
/configin the container is mapped to the./configin the current directory. Home assistant will create this directory and use it for its configuration files - we set the timezone to France/Paris, make sure to change this according to your location
- we require the container to restart automatically, e.g. after a reboot
And most importantly, we use the host network mode, which is necessary for home assistant to find some devices on your network.
Now, start the stack :
docker-compose up -d
Home assistant will need a bit of time to initialize. You can check that it is running by doing:
docker ps
>
CONTAINER ID   IMAGE                                 COMMAND   CREATED         STATUS         PORTS     NAMES
7ffb9ddfb5c4   homeassistant/home-assistant:stable   "/init"   4 minutes ago   Up 4 minutes             home-assistant
You can also check which ports are used by the home assistant server. To do this, install lsof :
sudo apt install lsof
sudo lsof -i -P  | grep LISTEN
>
sshd       521  root    3u  IPv4  15296      0t0  TCP *:22 (LISTEN)
sshd       521  root    4u  IPv6  15298      0t0  TCP *:22 (LISTEN)
sshd      4359    pi   10u  IPv6  29549      0t0  TCP localhost:6010 (LISTEN)
sshd      4359    pi   11u  IPv4  29550      0t0  TCP localhost:6010 (LISTEN)
python3   4982  root   12u  IPv4  32451      0t0  TCP *:8123 (LISTEN)
python3   4982  root   13u  IPv6  32452      0t0  TCP *:8123 (LISTEN)
We see that home assistant is listening to port 8123.
Assuming the name of your raspberrypi is raspberrypi, use your web browser to visite the home assistant user interface at
http://raspberrypi:8123
Follow the instructions to configure your server.
In this process, home assistant will certainly already detect devices and services on your network, such as connected printers, google cast devices, things like this.
Don't hesitate and set them up !
Finally, you end up on the main home assistant page, and you can configure almost anything from there.
Dashboard configuration
On the home assistant main page (Overview / Home), click on the three dots, and select Edit dashboard.
A window opens asking you whether you want to take control of your user interface. This is precisely what you want to, so fear not and take control !
Then, you'll be able to create new dashboard cards and tabs.

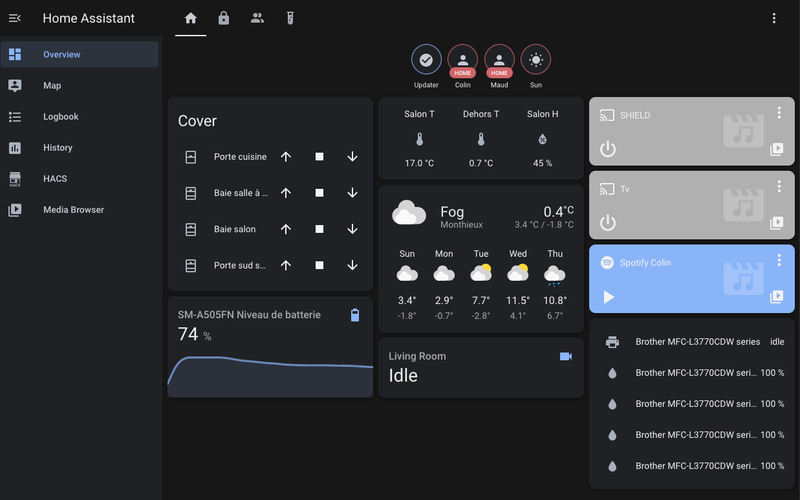
In the image below, you can see what I have so far on my main dashboard:
- control my covers with a 433 MHz RF emitter/receiver
- monitor various information on my phone (location, battery, WIFI network, ...). For instance, when the phone connects to my home WIFI network, the home automation system knows that I'm home
- monitor the temperature and humidity with 433 MHz sensors (they are accurate and cheap)
- display the weather forecast from Meteo France
- display the status of the Google Cast players
- control my spotify player
- monitor the status of the printer, and in particular the ink level of the four toners
If you'd like to have more details about one of these subjects, just tell me in the comments below.
And in the second tab, I set up a complete alarm system based on an array of Zigbee sensors.
The alarm system is fully automatic: when we're both away, the alarm is armed, and one of us comes back, it is disarmed, so we never have to think about it.
When the alarm is triggered, we get a loud pushbullet notification on our phones, so that we can check what's going on with the camera, and possibly call the cops. I still have to set up a siren though.
But enough for now, I'll write a specific post about the alarm later.

Please let me know what you think in the comments! I’ll try and answer all questions.
And if you liked this article, you can subscribe to my mailing list to be notified of new posts (no more than one mail per week I promise.)
Learn about Data Science and Machine Learning!
You can join my mailing list for new posts and exclusive content: